Experimental points

引言:

论文实验要点,一些简要的安装、执行和debug命令行记录

实验要点

运行环境

训练环境

服务器:192.168.71.215,用户:root,文件位置:home/zw/,硬件:Tesla P40,conda虚拟环境:zw,版本:python=3.6tensorflow-gpu=1.14

1
2
3
4
5
6
7
8
9
10
11
12
13
14
15
16
17
18
19
20
21
keras                     2.2.5                    pypi_0    pypi
keras-applications 1.0.8 pypi_0 pypi
keras-preprocessing 1.1.0 pypi_0 pypi
matplotlib 3.0.3 pypi_0 pypi
notebook 6.0.3 py36_0
numpy 1.17.1 pypi_0 pypi
opencv-python 4.1.0.25 pypi_0 pypi
pandas 0.25.3 pypi_0 pypi
pandoc 2.2.3.2 0
pandocfilters 1.4.2 py36_1
pillow 6.1.0 pypi_0 pypi
pip 19.2.2 py36_0
python 3.6.9 h265db76_0
python-dateutil 2.8.0 pypi_0 pypi
scikit-image 0.15.0 pypi_0 pypi
scikit-learn 0.21.3 pypi_0 pypi
scipy 1.3.1 pypi_0 pypi
sklearn 0.0 pypi_0 pypi
tensorboard 1.14.0 pypi_0 pypi
tensorflow-estimator 1.14.0 pypi_0 pypi
tensorflow-gpu 1.14.0 pypi_0 pypi

conda常用命令

先查看它的各个版本:

1
2
3
4
5
6
7
8
9
10
11
12
13
14
15
16
17
18
19
20
21
22
23
24
25
# 查看各个版本
conda search tensorflow
conda search tensorflow-gpu
# 查看环境
conda env list
# 新建环境
conda create -n xxxx python=X.X
# 删除环境
conda remove -n XXXX --all
# 复制环境
conda create -n XXXX --clone XXXX_new
# 删除没有用的包
conda clean -p
# 删除tar包
conda clean -t
# 删除所有的安装包及cache
conda clean -y -all
# pip 安装本地包
pip install ~/Downloads/a.whl
# conda 安装本地包
conda install --use-local ~/Downloads/a.tar.bz2
# 添加镜像
conda config --add channels https://mirrors.tuna.tsinghua.edu.cn/anaconda/pkgs/free/
conda config --add channels https://mirrors.tuna.tsinghua.edu.cn/anaconda/pkgs/main/
conda config --set show_channel_urls yes

安装jupuyer notebook

安装IPython和jupyter
1
2
3
4
5
6
7
8
9
10
11
12
sudo pip3 install ipython
sudo pip3 install jupyter notebook
==================================================================
ipython 7.12.0 py36h5ca1d4c_0
ipython-genutils 0.2.0 pypi_0 pypi
ipython_genutils 0.2.0 py36_0
jupyter 1.0.0 py36_7
jupyter-console 6.0.0 pypi_0 pypi
jupyter-core 4.6.3 pypi_0 pypi
jupyter_client 5.3.4 py36_0
jupyter_console 6.1.0 py_0
jupyter_core 4.6.1 py36_0
生成配置文件
1
2
jupyter notebook --generate-config
[y]
生成密码

在终端输入ipython进入IPython交互环境,创建登录密码:

1
2
3
4
5
In [1]: from notebook.auth import passwd
In [2]: passwd()
Enter password:
Verify password:
Out[2]: 'sha1:***************************************'

注意把生成的密文(Out[2])保存起来,在接下来的配置中要用。

修改默认配置文件

打开~/.jupyter/jupyter_notebook_config.py配置文件,在文件开头添加如下代码(该文件很长,但都是注释行):

1
2
3
4
5
c.NotebookApp.ip='*'  # 就是设置所有ip皆可访问
c.NotebookApp.password = u'sha1:*********************' #前边保存的密码信息
c.NotebookApp.open_browser = False #禁止自动打开浏览器
c.NotebookApp.port =8899 #随便指定一个端口,默认为8888
c.NotebookApp.allow_root = True #是否允许notebook在root用户下运行.
启动

在终端输入

1
jupyter notebook
windows的远程访问

登录地址为 http://服务器IP:端口号

打开浏览器在地址栏直接输入http://192.168.71.215:8899,在登录页面中输入之前设置的IPython密码即可完成远程登录。

展示环境

本机,conda虚拟环境:zw,版本:python=3.6tensorflow-gpu=1.12

CNN迁移学习要点

1.模型训练

模型构建

对于模型输入图片大小,使用全局平均池化代替全连接层,可以输入不同规格大小的图片。

感觉这是一个可以在文中介绍一下的点。

分析:知乎博客园

2.模型精度

1
2
3
4
5
6
7
8
9
10
11
12
13
14
15
import numpy as np
import pandas as pd
from keras.preprocessing.image import ImageDataGenerator
from keras.models import Sequential,load_model

test_datagen = ImageDataGenerator(rescale=1./255)
test_generator = test_datagen.flow_from_directory('/home/zw/isic_2019_dataset/test',target_size=(448, 448),batch_size=64,shuffle=False)
nsteps=len(test_generator)

# model = load_model("model/BCNN_keras/model-9c.h5")
# model.load_weights('./model/BCNN_keras/model-9c.h5')

test_loss, test_acc = model.evaluate_generator(test_generator, steps=nsteps)
# test_loss, test_acc = model.evaluate(test_generator, steps=5)
print('test acc:', test_acc)

3.结果指标

1
2
3
4
5
6
7
8
9
10
11
12
13
14
15
16
17
from sklearn.metrics import classification_report, confusion_matrix
from keras.preprocessing.image import ImageDataGenerator

test_datagen = ImageDataGenerator(rescale=1./255)
test_generator = test_datagen.flow_from_directory('/home/zw/isic_2019_dataset/test',target_size=(448, 448),batch_size=64,shuffle=False)
nsteps=len(test_generator)

y_true=test_generator.classes
class_label=test_generator.class_indices.keys()
test_generator.reset()
y_pred = model.predict_generator(test_generator,steps=nsteps)
y_pred_final = np.argmax(y_pred, axis=1)
print('Confusion Matrix')
cm=confusion_matrix(y_true, y_pred_final)
print(cm)
print('Classification Report')
print(classification_report(y_true, y_pred_final, target_names=class_label))

4.图像展示

1
2
3
4
5
6
7
8
9
10
11
12
13
14
15
16
17
18
19
20
21
22
23
24
25
26
27
28
29
30
31
32
33
import itertools
import matplotlib.pyplot as plt
def plot_confusion_matrix(cm, classes,
normalize=False,
title='Confusion matrix',
cmap=plt.cm.Blues):
if normalize:
cm = cm.astype('float') / cm.sum(axis=1)[:, np.newaxis]
print("Normalized confusion matrix")
else:
print('Confusion matrix, without normalization')
plt.imshow(cm, interpolation='nearest', cmap=cmap)
plt.title(title)
plt.colorbar()
tick_marks = np.arange(len(classes))
plt.xticks(tick_marks, classes, rotation=90)
plt.yticks(tick_marks, classes)

fmt = '.2f' if normalize else 'd'
thresh = cm.max() / 2.
for i, j in itertools.product(range(cm.shape[0]), range(cm.shape[1])):
plt.text(j, i, format(cm[i, j], fmt),
horizontalalignment="center",
color="white" if cm[i, j] > thresh else "black")

plt.ylabel('True label')
plt.xlabel('Predicted label')
plt.tight_layout()

plt.figure(figsize=(10, 10))
plot_confusion_matrix(cm, classes=class_label,title='Confusion matrix, without normalization')

plt.show()

TensorBoard展示

本机展示,一行命令

1
2
activate zw
tensorboard --logdir=F:\CondaProjects\tensorboard\vgg-8 --host=127.0.0.1

问题

1.本地远程访问服务器TensorBoard网页不能显示

解决:

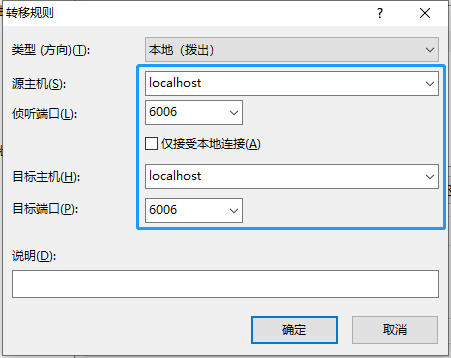
本人使用的Xshell,需要对其进行设置,添加隧道监听,如下:
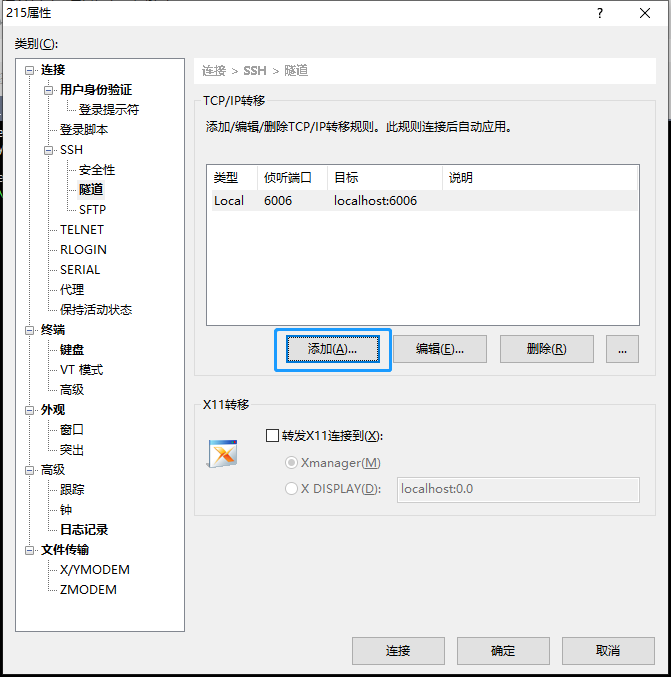
image-20191216111339014

image-20191216111526736

按以上数据修改保存,之后重新访问即可正常访问。

2.python画混淆矩阵尺寸无法对齐

解决:

更改matplotlib版本即可,本人使用的初始版本为3.1.1,重装3.0.3即可解决
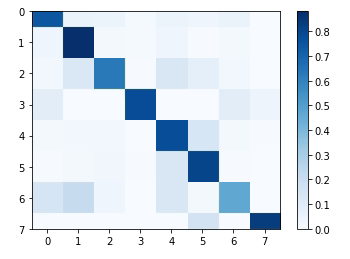
image-20191216112226592)image-20191216112255034

完美解决,感谢博主

论文梳理

摘要

一、绪论